

Views: 0 Author: Site Editor Publish Time: 2026-08-04 Origin: Site


In garment manufacturing, end-of-line inspections form the final barrier against defective products reaching consumers. Yet, facility managers often overlook a highly critical physical asset in this process. Incorrectly sized inspection tables directly contribute to inspector fatigue, slower throughput, and higher defect leakage. These failures cause batches to frequently miss strict acceptable quality level (AQL) standards.
Outfitting a functional QC room requires balancing floor space return on investment with stringent ergonomic requirements. Furthermore, deciding between standard and custom tables heavily impacts lead times and dictates your facility layout.
Below, we define the standard dimensions of a modern workstation. You will learn how specific garment categories alter these spatial requirements. Finally, we provide a clear evaluation framework. You can use this guide to assess hardware options and make smarter procurement decisions before upgrading your factory floor.
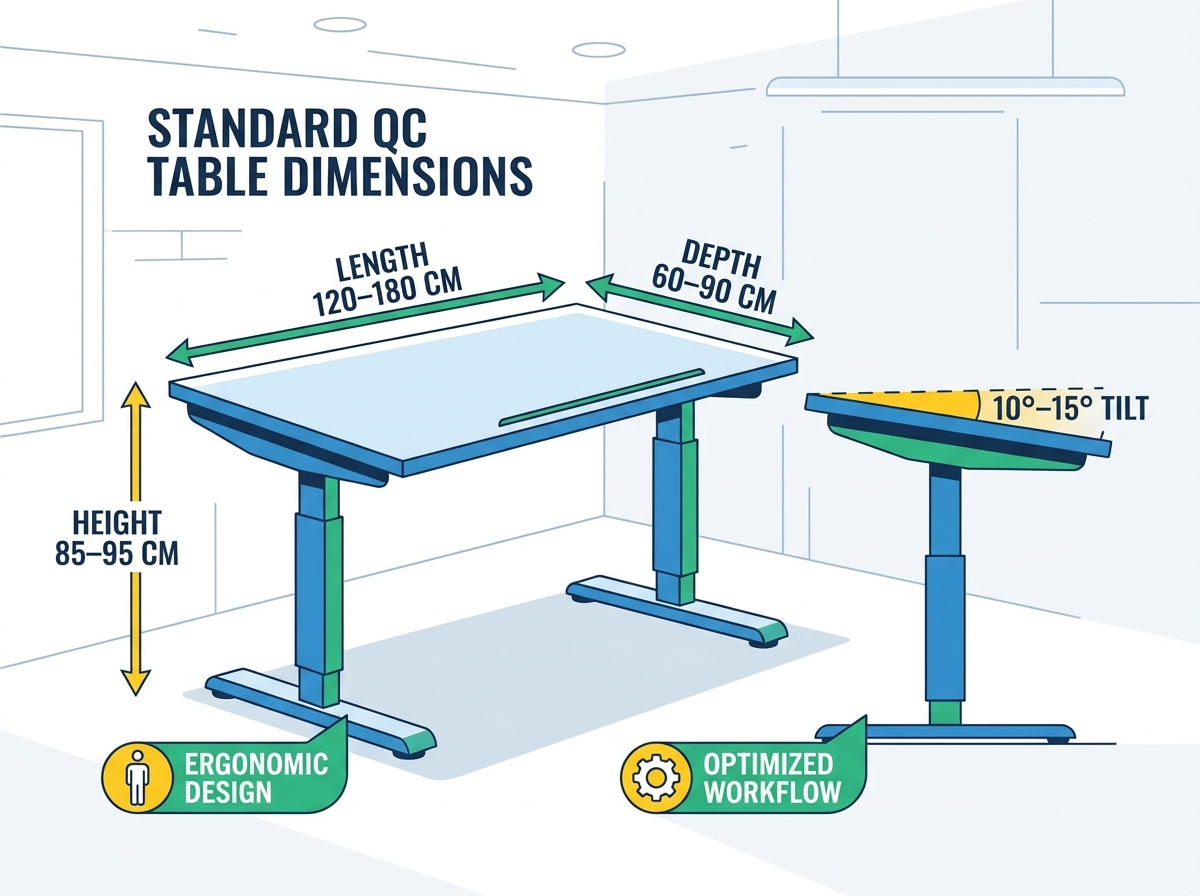
Standard Dimensions: Most standard garment inspection tables range from 120cm to 180cm in length, with depths of 60cm to 90cm, and heights optimized for standing (around 85cm to 95cm).
Ergonomics Over Aesthetics: A 10° to 15° surface tilt is standard to reduce neck strain and improve visual defect detection.
Surface & Lighting Interdependency: The table’s dimensions must support overhead or integrated lighting (usually D65 standard) without creating glare on the work surface.
Procurement Logic: Evaluate suppliers based on modularity, weight stability, and customization options rather than base price alone.
Establishing a baseline for physical equipment helps factory managers standardize their operating procedures. When you buy a QC table, you must understand the interplay between its footprint, height, and surface angle.
The most common footprint for a standard apparel workstation measures between 48 to 72 inches (120–180 cm) long by 24 to 36 inches (60–90 cm) wide. The width parameter is highly rigid. We constrain this depth specifically by the maximum reach of an average inspector's arm. If a tabletop exceeds 90 cm in depth, workers must lean awkwardly to inspect the far edges of the garment. This repetitive leaning strains the lower back over an eight-hour shift. The length parameter is more flexible and depends heavily on the volume of garments staged on the surface simultaneously.
Quality control operators typically stand to maintain mobility and alertness. Therefore, the standard standing height for these stations ranges from 34 to 38 inches (85–95 cm). Since human height varies significantly, fixed-height tables often pose ergonomic risks. Modern manufacturers increasingly specify height-adjustable legs. Telescopic or crank-adjusted legs accommodate different operators across multiple shift changes, ensuring the work surface always aligns just below the worker's elbow level.
A perfectly flat table is highly suboptimal for garment inspection. Flat surfaces force operators to bend their necks drastically to inspect items near the front edge, while items near the back edge fall out of sharp visual focus. To solve this, industry standards dictate a 10° to 15° forward tilt. This slight incline brings the top half of the garment directly into the inspector’s primary focal range. It significantly improves visual defect detection, especially for subtle issues like skipped stitches or slight fabric puckering.
Best Practice: Always lock the tilt mechanism securely. A shifting table surface can cause garments to slide off, interrupting the inspection workflow.
Common Mistake: Pushing standard office desks into the QC room. They lack the necessary tilt and sit too low, virtually guaranteeing operator fatigue.
The "standard" baseline works well for average apparel, but specialization is crucial. Different product categories demand distinct spatial setups to ensure inspectors can evaluate the entire piece without compromising accuracy.
Factories producing underwear, lingerie, or childrenswear can comfortably utilize the smaller end of the sizing spectrum. A 120cm length table is usually sufficient. Because these garments are small, they require much closer focal points. Inspectors often need to examine delicate lace or tiny snaps. In these cases, a flat surface or a very minor tilt (around 5°) is entirely acceptable, as the entire garment fits within an arm's reach.
This category represents the core use case for the standard 150cm length table. The 150x80cm dimension allows an adult-sized t-shirt or pair of trousers to be laid out entirely flat. Inspectors can view the side seams, hem, and collar simultaneously. The garment must never drape off the edges during a visual check, making this intermediate size the safest choice for mixed-apparel factories.
Bulky items require extended lengths (up to 200cm) and wider depths. Winter coats, heavy denim jeans, and medical gowns take up massive surface area. If you use a small table for outerwear, the fabric will drape over the edge. This draping stretches the seams and physically masks defects like incorrect tension or puckering. Appropriately oversized tables are critical here to ensure the garment remains entirely supported by the solid surface.
We must distinguish between a finished garment station and a continuous fabric inspection machine. A fabric roll machine features motorized rollers, extreme widths (often exceeding 250cm), and built-in full-table lightboxes for identifying weaving flaws. A finished garment station is purely for end-of-line checks, requiring entirely different mechanics, lower power requirements, and a smaller footprint.
Garment Category | Recommended Length | Recommended Depth | Ideal Tilt Angle |
|---|---|---|---|
Intimates & Childrenswear | 120 cm | 60 - 70 cm | 0° - 5° |
Standard Apparel (Shirts, Pants) | 150 cm | 75 - 80 cm | 10° - 15° |
Outerwear & Heavy Denim | 180 - 200 cm | 85 - 90 cm | 15° |
Human error drives most defect leakage in garment manufacturing. Understanding the ergonomics of your quality control table helps you mitigate these physical variables and maintain reliable end-of-line checks.
Physical strain directly correlates to a drop in inspection accuracy. When an operator suffers from back, neck, or eye strain, their concentration falters. This fatigue manifests in two costly ways: False Positives (rejecting good garments) and False Negatives (passing defective garments). By mid-afternoon, operators hunched over flat, poorly sized tables will naturally miss minor shade variations or loose threads. Ergonomic equipment acts as an insurance policy against this late-shift performance drop.
Industrial engineers divide workstations into reach zones. The "primary reach zone" is the immediate semi-circle in front of the operator. The garment sits exactly here, allowing the inspector to manipulate the fabric without moving their shoulders. The "secondary reach zone" spans the outer edges of the workstation. You should place measuring tapes, colored defect stickers, clippers, and reporting tablets in this secondary zone. Proper sizing ensures the secondary zone remains easily accessible without requiring the operator to walk around the station.
Table size strictly dictates your required lighting spread. A standard inspection environment requires overhead lighting hitting the D65 standard (natural daylight simulation). The light source must cover the entire table evenly, delivering 1000+ lux to the surface. If you purchase an oversized 200cm table but use standard 120cm tube lighting, you create dark shadows at the edges. Inspectors will subsequently miss defects on the sleeves or hems of large garments. Hardware and lighting must scale together.
Procuring a quality inspection table involves evaluating strict hardware and material specifications. The construction directly impacts daily functionality and garment safety.
The tabletop material dictates visual accuracy. The surface must be matte and entirely non-reflective. Glossy surfaces bounce high-intensity overhead light back into the inspector's eyes, causing severe glare and fatigue. Most high-grade tables use specific matte melamine or industrial laminate. Furthermore, the color must remain strictly neutral. Bright white or light grey are the industry standards. Wood grains or brightly colored surfaces cause color distortion (metamerism), making it impossible for operators to perform accurate shade sorting on dyed fabrics.
Garment inspection is a highly physical process. Operators frequently drop heavy batches of denim or outerwear onto the surface, pull garments aggressively to check seam strength, and lean against the frame. A professional station requires a heavy-duty frame, usually constructed from powder-coated tubular steel. A wobbly frame slows down the inspector and introduces a safety hazard. Cross-bracing between the table legs ensures the station remains rigid during high-throughput shifts.
An empty flat surface is rarely enough for a modern workflow. Evaluate hardware based on integrated tooling. Look for robust under-shelf storage capacity to hold bins for approved and rejected garments. Built-in upper rails or metal slots are highly valuable for hanging technical packs, reference samples, and defect logs. Swivel arms for digital tablets help operators input AQL data without cluttering the primary inspection zone.
Best Practice: Ensure the tabletop edges feature smooth, rounded PVC banding. Sharp or peeling edges will snag delicate fabrics like silk or chiffon, causing expensive factory-induced defects.
Common Mistake: Neglecting cable management. If you integrate tablets and localized lighting, exposed wires create snagging hazards for the garments passing through.
Choosing the right supplier streamlines your facility upgrade. Use this evaluation framework to bypass inadequate options and source equipment tailored to your actual production needs.
Decide early whether you need custom builds or standard off-the-shelf units. Standard sizes offer faster rollout times and cheaper freight costs. They work perfectly for facilities producing basic t-shirts or standard trousers. However, you should demand custom builds if your facility features unique architectural layouts, unusually tight support pillars, or if you manufacture highly specialized items like extreme weather gear or oversized bridal wear.
Assess how the supplier ships the hardware. Fully welded frames are incredibly stable but cost a fortune to ship internationally due to wasted volume. High-quality flat-pack systems reduce freight costs significantly, though they require internal assembly time from your maintenance team. Check if the supplier offers modular add-ons. The ability to attach localized lightbox modules, extra shelving, or tablet arms later gives your factory flexibility as your product mix changes.
Inspect the supplier's guarantees on structural integrity. Look for warranties covering frame welds and surface delamination. A cheap table might look identical on day one, but if the laminate surface peels after six months of heavy friction, it will snag garments and disrupt production. Demand technical specification sheets outlining the exact thickness of the steel and the type of surface bonding used.
Follow a structured procurement process to avoid costly spatial mistakes on your factory floor.
Map out your exact QC room floor plan, noting the location of power drops and overhead lighting banks.
Calculate the required number of tables based on your daily throughput targets and the average time it takes to inspect one piece.
Determine the maximum garment size in your upcoming production seasons to select the correct table length.
Request detailed CAD drawings or physical spec sheets from your short-listed suppliers.
Verify the edge-banding quality and surface color codes before placing the final purchase order.
Understanding standard inspection dimensions serves as your critical starting point. However, the optimal size for your facility is ultimately dictated by your specific product mix and your ergonomic goals. A small setup works for childrenswear, but outerwear demands maximum surface area to prevent defect masking.
When you prepare to outfit or upgrade your quality department, prioritize flexibility and human factors. Demand height-adjustable legs, enforce a 15-degree forward tilt, and strictly utilize neutral, non-reflective surfaces. By investing strategically in your physical hardware, you empower your quality control teams to maintain strict AQL standards reliably, day after day.
A: Not by default. Lightboxes are usually specific to continuous fabric roll inspection or advanced shade checking. However, some high-end garment tables feature modular, recessed acrylic panels to help operators check fabric density or spot internal needle damage.
A: The surface should be a neutral matte grey or bright matte white. These specific tones prevent color contamination, eliminate glare, and drastically reduce eye strain during continuous eight-hour shifts under intense lighting.
A: We strongly advise against it. Office tables feature the incorrect height for standing work, lack the necessary forward tilt, often have reflective surfaces, and feature insufficient edge durability for heavy daily industrial use.


