

Views: 0 Author: Site Editor Publish Time: 2026-08-07 Origin: Site


Visual inspection remains the primary defense against shipping defective garments to top-tier buyers. Yet, managers often treat workstation lighting as a basic facility overhead rather than a critical operational asset. This oversight carries significant risks on the fast-paced production floor. Standard factory overhead lighting rarely provides the clarity needed for detailed textile evaluation. Relying on inadequate illumination leads to "false accepts," where subtle defects ship out to customers. It also causes "false rejects," where perfectly good products end up in the scrap pile. Both errors severely impact factory profitability and strain vendor relationships. In this guide, we provide an evidence-based framework for configuring proper lighting at your inspection stations. You will learn how to meet strict international brand standards reliably. We will show you how to reduce daily operator fatigue and ultimately maximize your team's defect detection capabilities.
**Target Metrics:** Garment inspection requires a minimum of 1,000–1,500 Lux with a Color Rendering Index (CRI) of 95+ to accurately assess dye lots and fabric flaws.
**Color Temperature:** Standardize on 5000K–6500K (Daylight) to mimic natural light and meet international textile evaluation standards.
**Configuration Matters:** A dedicated QC table often requires both shadow-free overhead lighting for surface checks and integrated backlighting (light tables) for structural fabric flaws.
**Operator Ergonomics:** Flicker-free, diffused LEDs are mandatory to prevent eye strain and maintain visual acuity during long inspection shifts.
When poor lighting plagues the factory floor, business margins suffer directly. Shading variations, skipped stitches, and subtle oil stains easily hide under standard fluorescent tubes. Once these flawed garments ship out, buyers quickly issue rejected shipments. These chargebacks eat into profits heavily. You cannot afford to let poor illumination mask these critical errors. Every undetected flaw represents wasted materials and lost labor hours.
Operators face severe physical fatigue when straining their eyes to catch small details. Inadequate or glaring light accelerates eye strain significantly over time. You will notice a sharp drop in defect detection rates as a long shift progresses. Human eyes need high-contrast, properly balanced light to sustain focus. If the physical environment fights against their vision, workers will inevitably miss subtle construction errors.
Furthermore, compliance risks loom large for garment manufacturers globally. Tier-1 apparel brands mandate highly specific visual inspection conditions. They often tie these stringent rules to ISO standard illuminants. Failing to equip your quality control table to these specifications risks failing major facility audits. Passing a buyer audit requires demonstrable proof of standardized lighting conditions. Auditors actively measure these parameters during their initial floor walks.
Evaluating fabrics requires strict adherence to precise scientific metrics. You cannot guess when evaluating color accuracy or physical flaw detection. Equipping your quality inspection table demands a deep understanding of three core lighting parameters.
Standard commercial LEDs usually carry a CRI rating around 80. These fixtures fail spectacularly in apparel quality control environments. Low CRI distorts how operators perceive fabric dyes. You need a CRI of 90 or higher. Ideally, target a CRI greater than 95 for ultimate precision. This high rating accurately highlights metamerism issues. Metamerism happens when two colors appear identical under one light source but clash under another. For example, a zipper tape might match the main fabric under factory lights but look completely different in daylight. High CRI prevents these subtle dye lot discrepancies from slipping through to the consumer.
Color temperature defines the visual warmth or coolness emitted by the light source. The global textile industry standardizes color testing around 5000K (D50) to 6500K (D65). These specific ranges closely mimic natural daylight conditions. Many quality assurance experts cite 5800K to 6000K as the practical sweet spot for industrial floors. It provides crisp visual contrast without appearing overwhelmingly blue or harsh. It keeps operators highly alert while displaying accurate fabric tones consistently across different shifts.
Illuminance measures the sheer volume of light hitting the actual work surface. Baseline industry requirements dictate a minimum of 1,000 to 1,500 Lux at the fabric level. However, intense brightness means absolutely nothing if it clusters in a single spot. Light uniformity across the entire work surface prevents constant manual repositioning. If table corners look dim, operators will naturally compensate by moving garments into a central high-brightness zone. This extra handling wastes valuable inspection time and reduces daily throughput.
Lighting Parameter | Recommended Range or Value | Primary Purpose in Textile Evaluation |
|---|---|---|
Color Rendering Index (CRI) | 95 or higher | Ensures accurate color matching and detects dye metamerism between components. |
Correlated Color Temperature (CCT) | 5000K – 6500K | Mimics natural daylight for international compliance based on D50/D65 standards. |
Illuminance (Lux) | 1,000 – 1,500 Lux minimum | Provides baseline brightness needed to spot tiny structural defects easily. |
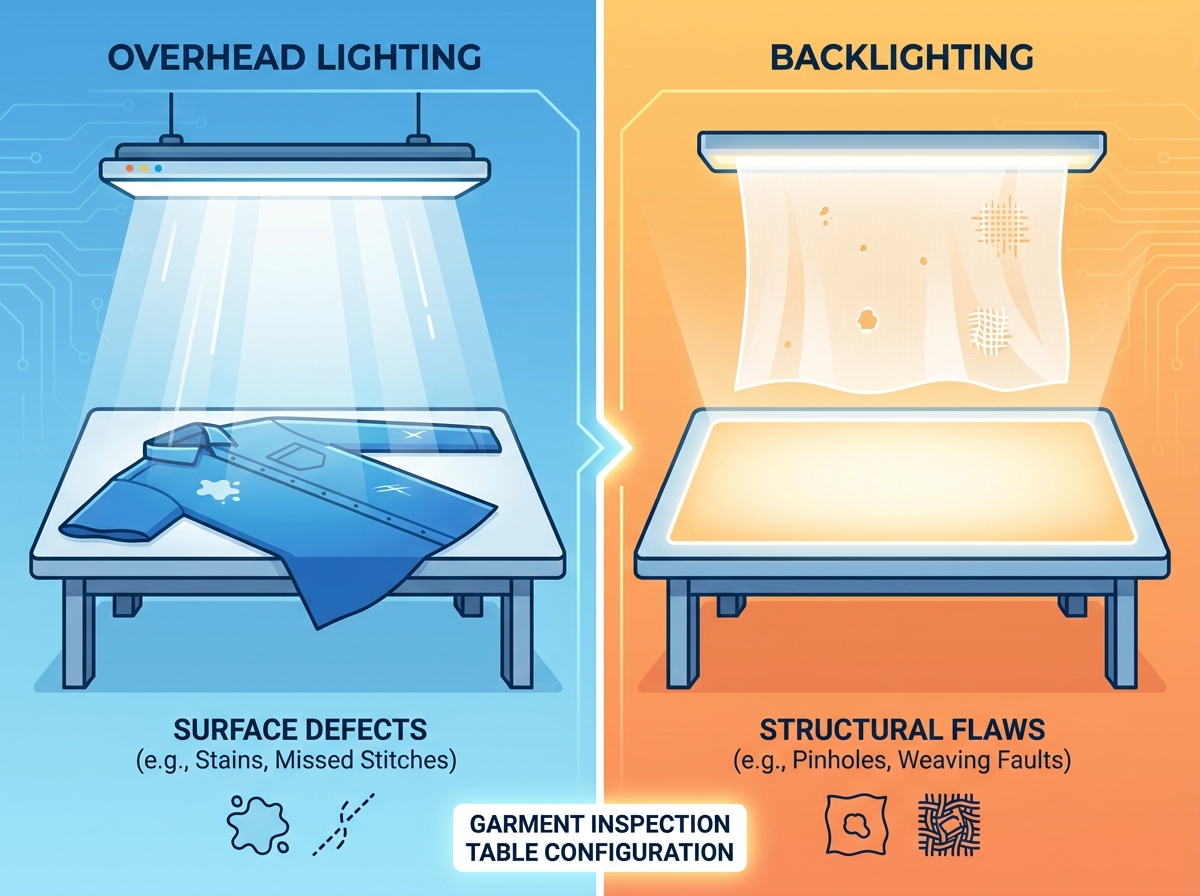
A highly functional workstation addresses both the exterior surface and the internal structure of a garment. Understanding how light interacts differently across various fabrics dictates the physical hardware setup.
Overhead illumination serves as the primary tool for identifying construction defects. Operators rely on it to catch puckering seams, missed stitches, surface stains, and misaligned print registrations. You must use broad, multi-directional light bars for this task. Single-point sources create harsh, distracting shadows. Multi-directional bars bathe the garment evenly from multiple angles. This approach eliminates structural shadows completely. It allows inspectors to view the garment exactly as the end consumer would.
Sometimes surface checks miss internal material flaws entirely. This highlights exactly when you should integrate a frosted glass or acrylic backlit panel into your QC table. Backlighting reveals the internal integrity of the textile instantly. It becomes essential for detecting weaving faults, tiny pinholes, and fabric density irregularities. If you evaluate opacity in lightweight summer textiles or performance athletic mesh, a backlit table remains absolutely crucial for strict quality assurance.
The best factory setups give operators immediate flexibility. You always want dual-zone control at the workstation. This operational advantage allows inspectors to switch between overhead and backlighting instantly. They can even combine both zones simultaneously for complex evaluations. Adapting the specific light profile to match the exact garment type makes the inspection process highly efficient. It empowers the worker to spot unique defect profiles quickly without moving to another station.
Operators stand at inspection stations for many hours straight. Poor lighting configurations cause immense physical discomfort and mental fatigue. You must factor human ergonomics heavily into your final lighting choices. Let us examine the main implementation risks you will face.
Exposed LED diodes create intense, blinding glare. This poses a massive visual risk during quality checks. Diffusers remain critical components of any professional setup. They scatter the light gently over the fabric surface. If your team inspects synthetic, semi-reflective fabrics like activewear or nylon outerwear, bare diodes will blind them quickly. Proper diffusers soften these harsh reflections and protect the visual comfort of your staff.
Cheaper commercial LED options carry a severe hidden cost. They often suffer from low-frequency pulse width modulation flicker. While sometimes invisible to the naked human eye, this rapid flicker causes severe headaches over a full shift. It reduces mental focus and dramatically increases human error rates. Always specify high-frequency or explicitly flicker-free drivers for your workstations. Investing in stable power supplies keeps your team alert and physically healthy.
Intense commercial lighting generates significant ambient heat. Thermal management within the fixture matters deeply for long-term operator comfort. It becomes a major physical issue when inspectors handle heavy winter garments. It also compounds worker discomfort in non-climate-controlled factory environments. Look for fixtures featuring robust aluminum heat sinks. They draw warmth away from the operator efficiently, keeping the immediate workspace temperate and comfortable.
Transitioning to superior factory lighting requires a highly structured approach. Do not rely entirely on marketing brochures or basic catalog specs. Follow this structured process to standardize your factory floor lighting effectively.
Conduct a Fabric-Specific Trial: Start by testing new lighting setups against your most difficult materials. Use dark navy fabrics alongside black fabrics. Check complex tone-on-tone stitching details. See how easily operators spot tiny flaws under the newly proposed lamps.
Verify and Calibrate Upon Installation: Do not trust manufacturer box specifications blindly. Once you install the lamps, verify their actual output immediately. Use a handheld spectrometer and a lux meter directly at the table surface. Confirm the CCT, CRI, and Lux levels match your required baselines perfectly.
Plan for Maintenance and Lumen Depreciation: Commercial LEDs degrade predictably over time. Their lumen output gradually drops. Establish a strict hardware replacement schedule. A setup pushing 1,200 Lux today might easily fall below the 1,000 Lux threshold in 24 months. Regular checks prevent gradual quality decline.
Best Practice: Maintain a master log of light meter readings. Record the Lux levels of each station monthly to predict degradation trends before they cause inspection failures.
Common Mistake: Many facility managers assume industrial LEDs last forever without losing visual intensity. They fail to budget for scheduled bulb or driver replacements, leading to sudden compliance failures during audits.
A properly illuminated inspection station operates as a critical investment in risk mitigation. You should never view it merely as a basic furniture purchase. It serves as your absolute final defense against costly chargebacks and dissatisfied major clients.
We strongly recommend prioritizing fixtures offering a high CRI above 95. Select an appropriate daylight color temperature ranging between 5000K and 6500K. Above all, ensure the final lighting application remains perfectly diffused and completely shadowless across the workspace.
Your immediate next step involves a comprehensive facility audit. Grab a reliable handheld light meter today. Audit your current inspection stations thoroughly. Cross-reference your real-time findings against the strict quality manuals provided by your primary buyers. Close any glaring gaps you find immediately to safeguard your overall production quality.
A: A standard table provides a simple flat surface for basic tasks. A dedicated QC table integrates specialized, shadow-reducing overhead light directly into the frame. It often includes a built-in backlit panel made of frosted glass or acrylic. Manufacturers build these specifically for intense visual defect detection and ergonomic comfort.
A: No. Standard shop lights typically feature a low Color Rendering Index of 70 to 80. This low rating distorts color perception, making subtle dye variations invisible. They also usually lack the specialized diffusers needed to prevent harsh glare on semi-reflective textiles, which quickly causes operator eye strain.
A: 6000K is highly superior for fabric inspection. The 5000K to 6500K range accurately mimics natural daylight. This provides significantly higher visual contrast for detecting structural flaws. It also guarantees accurate color evaluation. In contrast, 4000K emits a yellowish tint that alters dye perception and hides subtle metamerism issues.
A: You should measure Lux levels and color temperature bi-annually using calibrated meters. LED output naturally degrades over time. You must replace the fixtures immediately when their output drops below your required 1,000 Lux threshold, or if operators report any visible flickering during their daily shifts.


